Maven 多模块项目在eclipse下面热部署,即你可以体验下无论你修改整个项目里面的任何模块的代码,都不需要用maven打包就可以看到效果,
1、首先准备好创建一个maven多项目的代码,准备好一个eclipse,一个tomcat,什么java环境,tomcat环境我就不多说了,如果这个你都没有配好就别往下看了,
2、创建项目,mvn archetype:generate -DgroupId=com.laoshuisheng -DartifactId=test -Dversion=1.0
创建成功后到pom.xml文件里面修改pom.xml
-
projectxmlns="http://maven.apache.org/POM/4.0.0"xmlns:xsi="http://www.w3.org/2001/XMLSchema-instance"
-
xsi:schemaLocation="http://maven.apache.org/POM/4.0.0http://maven.apache.org/xsd/maven-4.0.0.xsd">
-
<modelVersion>4.0.0</modelVersion>
-
-
<groupId>com.laoshuisheng</groupId>
-
<artifactId>test</artifactId>
-
<version>1.0</version>
-
<packaging>jar</packaging>
-
-
<name>test</name>
-
<url>http://maven.apache.org</url>
-
-
<properties>
-
<project.build.sourceEncoding>UTF-8</project.build.sourceEncoding>
-
</properties>
-
-
<dependencies>
-
<dependency>
-
<groupId>junit</groupId>
-
<artifactId>junit</artifactId>
-
<version>3.8.1</version>
-
<scope>test</scope>
-
</dependency>
-
</dependencies>
-
</project>
修改成下面
-
ojectxmlns="http://maven.apache.org/POM/4.0.0"xmlns:xsi="http://www.w3.org/2001/XMLSchema-instance"
-
xsi:schemaLocation="http://maven.apache.org/POM/4.0.0http://maven.apache.org/xsd/maven-4.0.0.xsd">
-
<modelVersion>4.0.0</modelVersion>
-
-
<groupId>com.laoshuisheng</groupId>
-
<artifactId>test</artifactId>
-
<version>1.0</version>
-
<packaging>pom</packaging>
-
-
<name>test</name>
-
<url>http://maven.apache.org</url>
-
-
<properties>
-
<project.build.sourceEncoding>UTF-8</project.build.sourceEncoding>
-
</properties>
-
-
<dependencies>
-
<dependency>
-
<groupId>junit</groupId>
-
<artifactId>junit</artifactId>
-
<version>3.8.1</version>
-
<scope>test</scope>
-
</dependency>
-
</dependencies>
-
</project>
进入该项目里面随便的创建几个模块,我这里为了方便就只创建两个模块好了,一个就是web项目,一个就是业务代码
.../test>mvn archetype:generate -DgroupId=com.laoshuisheng.web -DartifactId=test-web -DarchetypeArti
factId=maven-archetype-webapp -Dversion=1.0
创建业务代码项目:
../test>mvn archetype:generate -DgroupId=com.laoshuisheng.web -DartifactId=test-core -DarchetypeArt
ifactId=maven-archetype-quickstart -Dversion=1.0
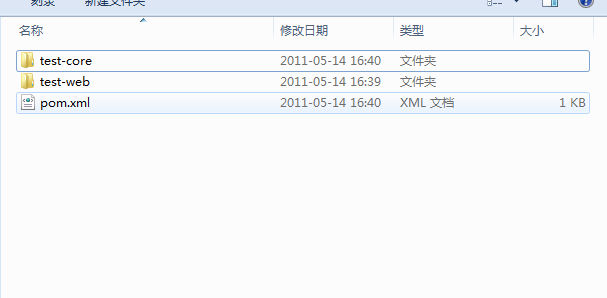
创建完了如下图:
好了现在项目创建成功了,我们要导入eclipse了,这一步也很重要,大家要细心的看了,导入的命令是:
...test>mvn eclipse:eclipse -Dwtpversion=1.0
记得不要缺少 -Dwtpversion=1.0,这个说明了eclipse认出它就是web项目,而不是简单的java项目,大家应该知道web项目在eclipse可以做一些其他的事情吧。
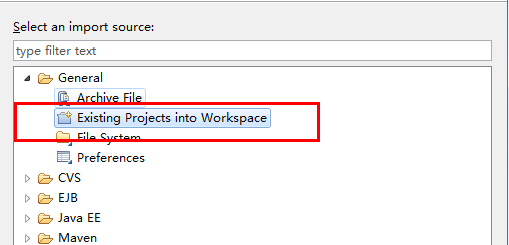
记住了,是一般的导入,不是maven项目导入。
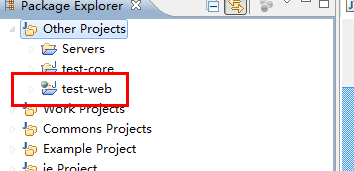
看见了吧,项目上面有个小地球,证明eclipse认出了他就是java web项目,没错,就是这个会给我们意想不到的效果
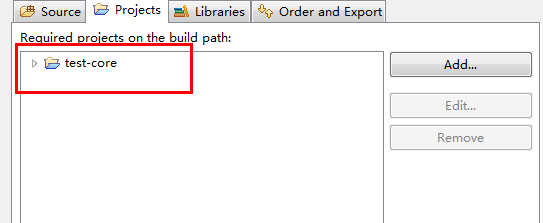
接下来我们去把项目依赖加上,在web项目想的pom.xml里面增加对test-core的依赖:
-
<?xmlversion="1.0"?>
-
<project
-
xsi:schemaLocation="http://maven.apache.org/POM/4.0.0http://maven.apache.org/xsd/maven-4.0.0.xsd"
-
xmlns="http://maven.apache.org/POM/4.0.0"xmlns:xsi="http://www.w3.org/2001/XMLSchema-instance">
-
<modelVersion>4.0.0</modelVersion>
-
<parent>
-
<artifactId>test</artifactId>
-
<groupId>com.laoshuisheng</groupId>
-
<version>1.0</version>
-
</parent>
-
<groupId>com.laoshuisheng.web</groupId>
-
<artifactId>test-web</artifactId>
-
<version>1.0</version>
-
<packaging>war</packaging>
-
<name>test-webMavenWebapp</name>
-
<url>http://maven.apache.org</url>
-
<dependencies>
-
<dependency>
-
<groupId>junit</groupId>
-
<artifactId>junit</artifactId>
-
<version>3.8.1</version>
-
<scope>test</scope>
-
</dependency>
-
<dependency>
-
<groupId>com.laoshuisheng.web</groupId>
-
<artifactId>test-core</artifactId>
-
<version>1.0</version>
-
</dependency>
-
</dependencies>
-
<build>
-
<finalName>test-web</finalName>
-
</build>
-
</project>
加上后重新 mvn eclipse:clean eclipse:eclipse下刷新下eclipse的项目发现:
这个时候就该配置到服务器上了,因为虽然说是maven项目,但是我们开发的时候服务器运行的是web下面的classes下的class文件和
webapp下面的jsp/css/js等文件,所以并不需要打包什么的,如果是依赖如test-core也是跑classes的编译后的代码,所以也不需要编译,但是这里有个问题就是配置文件必须是放在classpath下面,因为我刚刚已经说了原因了,,废话不多说,看是配服务器,

这就是我们创建好的tomcat服务器,然后大家点下 右键 ,记得是在服务器上点右键哦, 弹出个对话框,不错是弹出对话框,上面有个add and remove 的选项,你会发现有个test-web

看到了吧,知道为啥我一定要强调导入项目的时候加上 -Dwtpversion=1.0了吧,这样他才能在这里加,eclipse才认出它就是web项目,哈哈,到这里基本上已经成功了,看看加后的效果:
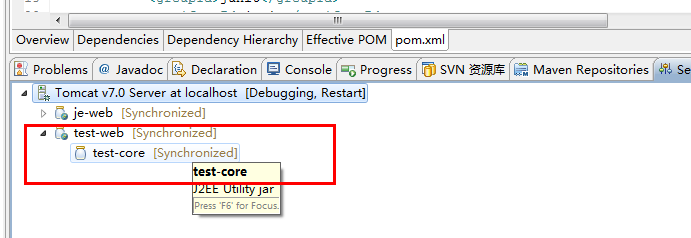
不错~不错,看到这样说明连带依赖的模块也成功加载了,嗯,现在你可以随意的修改这两块里面的代码,都不需要重新打包、不需要重新启动服务器,因为我们是运用了eclipse的热编译来实现的,或者说我们根本不需要在开发中运用到maven的功能。
好了。到这里maven的多模块的项目的热编译就完全可以无任何插件的实现了,如果大家有什么不明白的直接来问我,谢谢!
转载自:http://blog.csdn.net/laoshuisheng/article/details/6420003
命令行创建:http://blog.csdn.net/wfung_kwok/article/details/8562074
eclipse创建:http://monsoongale.iteye.com/blog/1822994
复杂的依赖关系:http://www.cnblogs.com/quanyongan/archive/2013/05/28/3103243.html
分享到:


相关推荐
maven多模块项目,采用阿里巴巴连接池,springmvc,spring,slf4j与log4j日志,数据库为mysql,页面为jsp
所有用Maven管理的真实的项目都应该是分模块的,每个模块都对应着一个pom.xml。它们之间通过继承和聚合(也称作多模块,multi-module)相互关联。 提供了一个简单的Maven多模块实例
maven多模块项目,使用eclipse开发工具创建,有意可下载,没有解压密码
Maven多模块项目编译速度慢,下面我们来学习下优化的方法。 mvn clean package -T 4C -Dmaven.test.skip=true -Dmaven.compile.fork=true -T 4C 代表本机4个CPU内核都参与编译工程, -Dmaven.test.skip=true 代表...
详细介绍IDEA从远程仓库SVN拉去MAVEN项目.多模块的项目
NULL 博文链接:https://yansxjl.iteye.com/blog/2333900
使用Maven构建多模块项目
1.2.maven多模块项目配置1
使用spring+springMvc+Mybatis+maven搭建多模块化的web项目
前提eclipse已安装maven插件,maven插件可以在线安装但会有很多问题,也可以在网上找离线安装包安装。
详细介绍idea通过svn检出maven多模块项目,每一步都有截图以及操作顺序,很完整。
Springboot整合dubbo构建maven多模块项目 - 集成 mybatis
Maven-maven多模块项目搭建+SSM框架整合
eclipse + maven多模块项目框架 + jetty热部署的实例源码 让你掌握maven中那些令人迷惑的一堆配置,基于此框架快速搭建maven多模块项目完美环境。
应网友要求,重新整理原《eclipse + maven多模块项目框架 + jetty热部署的实例源码》,增加了各配置的详细注释。 并且基于Spring MVC提供了一个完整功能:实现了生成验证码图片,以及验证输入是否匹配的两个接口,...
springboott创建maven多模块项目1
Springboot整合dubbo构建maven多模块项目 简单实例,包括Server和client两个子模块
eclipse下创建ssm+MySQL+maven多模块项目。此demo用于提供给新手学习使用,如有不妥之处请联系楼主